Rock Crafts for Fun
Rock Crafts for Fun
by Darcy Howard
Sometimes I pick up a rock just because it has a nice shape. I'm not a mineralogist like Mikey, actually I'm not even a rockhound. I'm an artist of the scientific illustrator type and have done arts and crafts for fun. I like rocks and minerals because they are pretty.
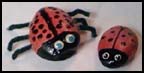 At our house, and many other houses too, we use rocks and stones to do crafts. From river rocks to cut and faceted gemstones, artists of all kinds have found fun things to do with rocks. The "pet rock" ladybugs at right are paperweights that we painted from smooth oval-shaped river stones. When choosing a rock for this kind of project, find one that has a nice shape to it, and one that will set well on a flat surface. Sometimes the top of the rock is perfect, but underneath is so wobbly that it is hard to paint and won't set well where you'd like to put it. Begin by washing the stone to remove loose dirt and mud, then decide what kind of buggy creature you'd like to make. If the rock is grainy and rough, put on a base coat of gesso (or white latex house paint) to make it smoother and brighter for your next coat of paint. Gesso is a thick, water based white paint for preparing art surfaces. You can buy a bottle or jar of it at craft stores. Then you can use tempera paint, acrylic paint, some types of watercolors, markers, ink pens (Pigma fine-tip felt pens make great lines), model paints or fingernail polish to create your creatures. Eyeballs can be glued or painted on. Then for a final finish coat, spray a clear sealer on the rock.
 Here's a crafter's tip on how to paint good eyes: Contrast is important. The black of the eye is usually the darkest part of a painting, and the white highlight can be the brightest part. Using the HANDLE stick end of a large size paint brush (a round handle, about the size of a pencil, that is) dip your stick into a good opaque white paint (gesso is very good for this part of the eye) and make a dot with it. Try these dots on a piece of paper first. You'll notice that the first dot you make is the largest, and they get smaller and smaller as the paint gets used up. You can make a much better dot with the stick end of the brush than you can with the bristles. Anyway, make a large white dot, let it dry - you can use a hair dryer if you want to hurry it- then make a little bit smaller black dot in the center of the white dot. After that dries, paint the highlight of the eye with a tiny white dot, making sure to put it in the same place on both eyes. Having the highlight dot in the same place on both eyes will make the eyes appear to be looking in the same direction. So these eyes have three dots together, not just one dot.
 Another kind of rock that is great to paint on is the smooth white quartz landscaping pebbles. These rocks can be found at some landscape and garden stores in big piles, and they might let you pick through their pile to find just the right stones. These kinds of rocks don't have to be gessoed, and can usually be painted or written on directly. If you are lucky enough to live in or visit a part of the world that has a stony beach (like some places in New Zealand), you could get wonderful rocks for these types of projects. In Arkansas, many of the creek and riverbeds have nice smooth rocks, and if you are really lucky, you might find a river-tumbled quartz crystal that has been smoothed and rounded by its trip down stream.
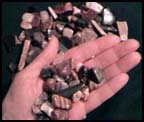 Speaking of rounded stones, there is a gizmo called a rock tumbler you can get at craft stores, rock shops, or lapidary supply mail order houses. To use a tumbler, you put in pieces of stones or chips, add an abrasive powder, and let it go to work. You know those places where you buy hot dogs that have been rolled for miles on the cooker... the rock tumbler does the same kind of thing. Not cook the rocks of course, but roll them for such a long time that they become very smooth. It takes weeks for the process to complete, changing abrasives according to the instructions, and adding a polish as the final step. You can put a tumbler out in the garage where you don't have to worry with it, and it will roll along doing its thing.
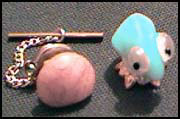 When the stones are finished, you'll have neat pieces that you can make jewelry with, paint on, or make more buggy creatures out of. The metal parts of the jewelry are called 'findings'. They are not expensive at craft stores, and you can get all sorts of findings to make different kinds of jewelry. Caps are metal fittings that can be easily bent to fit your shape stone. You glue these caps onto the stone with a special type of clear jeweler's glue, and then attach the cap with a link ring to a necklace or bracelet. If you are creative, you can think of other things to do with the findings, like glue caps on the bottom of the rock for legs! Earrings, pins, tie tacks, all manners of things, you can make when you try! They make great gifts or items for a craft show.
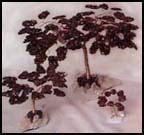
 Now that we are talking about jewelry, you can spend as much time and money as you'd like by getting into other ways of using stones. Some of my personal jewelry is wire-wrapped. Those people who make this kind of decorative art start with straight wire, either round or square, and using either their fingers or tiny pliers, bend the wire to hold the stones. Your tumbled stones will work if they are shapes that you can hold it inside your wire. That's the tricky part, to create a "cage" of some sort that prevents the stone from falling out, and displays it in a beautiful way. I only admire these works, I can't tell you how to do it. There are books and magazines available, and if you are in a part of the world where you could take a class in jewelry, so much the better. Wire wrapping, like many other crafts, appears deceptively easy, but does take practice.