Crystal Growing Experiments
Kitchen chemistry is fun for science projects and learning. Here's how to grow your own crystals and cave formations. If you are a kid, get an adult to help you. If you are an adult, get a kid to help you.
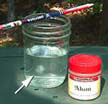
![]() Grow Alum Crystals
Grow Alum Crystals
Read through the entire directions before starting.
You will need:
• One ounce of alum (you can buy alum in the grocery store in the spice section. It is used for making pickles. An ounce is about 2-1/2 tablespoons, but you won't need all of it, just what will dissolve in the solution)
• 1/2 cup hot water from the faucet, not boiling water
• sewing thread or nylon thread (cotton is easier to tie, but will grow crystals along its length, nylon won't)
• 2 clean jars or cups
• a spoon for stirring
• a popcicle stick, flat plastic knife, or pencil to suspend your crystal
• coffee filter to act as a dust cover
Step 1.
Add the alum slowly to the cup of hot water. Stir in all the alum that the water will dissolve, not the whole ounce. Cover loosely with the coffee filter to keep out dust. Let the cup sit overnight.
Step 2.
On the next day, pour the alum water into the other empty cup. A few chunks or crystals of solid alum will have formed in the bottom of the jar. These pieces will be your "seeds" to start the new crystal. Tie a piece of thread around the largest, best formed crystal, and then tie the other end of the thread to the middle of the stick. A slip knot works well, and tying the knot on the crystal is the hardest part of this whole procedure. Suspend the seed in the alum water, with the stick resting across the jar of solution. The seed should dangle in the alum water. Cover loosely with the coffee filter.
 Step 3.
Look at your experiment a couple of times a day. What is happening? If crystals start forming in the bottom of your jar of solution, remove your stick and carefully pour or spoon the alum water into another clean jar, being very careful not to let the crystals on the bottom get into your other jar. They will also act as seeds, and will keep your big crystal from growing.
Growing Stalactites and Stalagmites
Ever been in a cave and seen all the beautiful dripping formations? The columns, stalactites and stalagmites grow over the centuries as lime is dissolved out of the ground by rainwater, then slowly deposited again by the water as it drips into the cave. Remember, stalactites (with a "c" in the middle) grow from the ceiling of the cave, and stalagmites (with a "g" in the middle) grow up from the ground. When they meet, a column is formed.
You can create your own cave formations with this experiment.
You will need:
• 2 empty pint jars to hold the solutions
• a strip of absorbent cloth like an old towel, about one inch wide and 18 inches long, this will act like a wick
• measuring cup and spoon
• hot water
• tray, or cookie sheet to catch the many drips
• 10 tablespoons of washing soda (sodium carbonate), it can be found in larger grocery stores in the laundry soap section
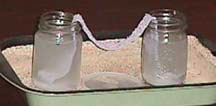 Do this: Wash and rinse the jars with hot tap water. Pour one and a half cups of hot water into each jar. Add 5 tablespoons of washing soda to each jar, and stir until the soda is dissolved. Put the towel strip in between the two jars as shown. The towel will begin to drip. Your "formations" will begin to grow, and if you are patient, they will meet and form a column. There is a lot of dripping, put this experiment in a place where it won't cause a mess.
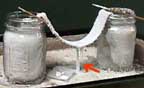
The column on the right formed rather quickly when the room temperature was warm and dry. Setting the experiment by the hot wood stove made it grow faster. The stalactite grew fast when the water level got down almost to the level equal to the bottom of the sag of the towel strip. When it dripped fast at first, all the solution dried on the bottom of the pan.  After the solution got below the level of the center of the towel, the strip of fabric got very stiff, and crystals began growing in the jars. The solution needed more water. When I added more water, the towel began to drip again, and quickly dissolved my column!
Another way to form a stalactite is to use a dropper, and put one drop of solution at a time on a saturated wick. Let it dry, and next time you pass by, add one or two more drops, just until it almost drips again. The object is to create a hanging drop of solution, which will dry and form the stalactite. Repeated applications will grow the formation.
Chemistry note: Baking soda (that you put in cakes and cookies) is sodium bicarbonate. Washing soda is slippery, soapy sodium carbonate. Lye or caustic soda is sodium hydroxide. Stay away from the lye, it is very dangerous, and will cause chemical burns.
Growing a crystal garden
You will need:
• a plastic container, like a large margarine tub
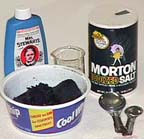
• pieces of charcoal, pieces of broken clay flowerpots, and bits of sponge
• salt
• liquid laundry bluing*
• household ammonia (Ammonia is an irritant. That means it will stink your nose off. Keep it away from your face.)
• a plastic cup
• a tablespoon
• water
 Day One:
Put the charcoal and the fragments of pot and sponge into the butter tub. Soak these parts in water for 15 minutes, then drain. Sprinkle over the fragments:
2 tablespoon of water
2 tablespoons of salt
2 tablespoons of bluing
This tub full will look pretty terrible at the beginning.
Day Two:
Sprinkle on two more tablespoons of salt. It will still look terrible today.
Day Three:
In the plastic cup, mix together 2 tablespoons of salt, 2 tablespoons of water, 2 tablespoons of bluing, and 2 tablespoons of ammonia. Stir well and carefully pour the solution into the bottom of the container - not on the crystals. It still will look and smell like a horrible blue glop, but then it begins to change.
Now what happens???
When your crystals stop growing, mix up another batch of solution like you did for day number three, and spoon it onto the materials. New crystals will form. You may also try adding some drops of food coloring or watercolors to your garden.
I can't show you any pictures of what was growing in my crystal garden. I had a row of crystal experiments lined up on the back porch, and our neighbors' dog ate them....
And to mention eating crystals, one of the most famous recipes for crystals is one YOU can eat:
Rock Candy
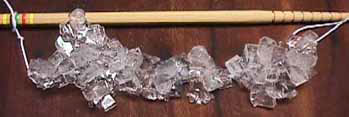
Dissolve 1 1/2 cups sugar in 1/2 cup boiling water. This is a thick, hot syrup. It will burn you and keep on burning your skin because it is sticky, so be *very* careful not to spill it on yourself! We put our solution in a 1 1/2" deep tray, and suspended crochet twine from chopsticks for the crystals to grow on to. These crystals grew for about two and a half weeks before we couldn't stand it any more and took them out.
There is much more information you can learn about growing crystals. Why do you need a seed crystal? What are saturated and supersaturated solutions? What happens when dust gets in your jar? Why do crystals have certain shapes? Read more and find out!
See also the related article on manmade quartz crystal. Another series of articles by Mike and Darcy Howard, a nine part primer on crystallography:Introduction to Crystallography and Mineral Crystal Systems
 Read more about growing crystals
 The recipes above were adapted from the book Crystals and Crystal Gardens you can Grow by Jean Stangl. This hardcover book has many and varied recipes for growing single crystals, crystal castles and pans full of crystal "gardens." Some projects create crystals in minutes, others take a few days. It is written for younger readers, but presents crystal growing to fascinate adults too. Clear directions, illustrations, and color photos make crystal growing fast and fun. Good elementary school science projects and scout activities. Third grade and up.
 A book for the serious crystal grower is Crystals and Crystal Growing by Alan Holden and Phylis Morrison. This book discusses crystallography along with crystal formation. The recipes presented in this book use chemicals that are more difficult to get, but result in astonishingly beautiful crystals. High school age and up.
Have you grown some pretty crystals? Send us photos!
*Liquid laundry bluing may be hard to find at your grocery store. You can write Mrs. Stewart's Liquid Bluing at Luther Ford & Co, P.O. Box 201405, Bloomington, MN 55420. They also have directions for a science project showing crystal growth.